
Florida CDL Handbook: Inspecting a Combination Vehicle
6. Combination Vehicles
- 6.1. Driving Combination Vehicles Safely
- 6.2. Combination Vehicle Air Brakes
- 6.3. Antilock Brake Systems
- 6.4. Coupling and Uncoupling
- 6.5. Inspecting a Combination Vehicle
Use the seven-step inspection procedure described in Section 2 to inspect your combination vehicle. There are more things to inspect on a combination vehicle than on a single vehicle. (For example, tires, wheels, lights, reflectors, etc.) However, there are also some new things to check. These are discussed below.
6.5.1 - Additional Things to Check During a Walkaround Inspection
Do these checks in addition to those already listed in Section 2.
Coupling System Areas
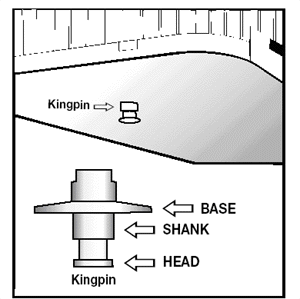
Figure 6-8
- Check fifth wheel (lower).
- Securely mounted to frame.
- No missing or damaged parts.
- Enough grease.
- No visible space between upper and lower fifth wheel.
- Locking jaws around the shank, not the head of kingpin. See Figure 6.8.
- Release arm properly seated and safety latch/lock engaged.
- Check fifth wheel (upper).
- Glide plate securely mounted to trailer frame.
- Kingpin not damaged.
- Air and electric lines to trailer.
- Electrical cord firmly plugged in and secured.
- Air lines properly connected to glad hands, no air leaks, properly secured with enough slack for turns.
- All lines free from damage.
- Sliding fifth wheel.
- Slide not damaged or parts missing.
- Properly greased.
- All locking pins present and locked in place.
- If air powered--no air leaks.
- Check that fifth wheel is not so far forward that tractor frame will hit landing gear, or the cab hit the trailer, during turns.
Landing Gear
- Fully raised, no missing parts, not bent or otherwise damaged.
- Crank handle in place and secured.
- If power operated, no air or hydraulic leaks.
6.5.2 - Combination Vehicle Brake Check
Do these checks in addition to Section 5.3: Inspecting Air Brake Systems.
The following section explains how to check air brakes on combination vehicles. Check the brakes on a double or triple trailer as you would any combination vehicle.
Check That Air Flows to All Trailers. Use the tractor parking brake and/or chock the wheels to hold the vehicle. Wait for air pressure to reach normal, then push in the red "trailer air supply" knob. This will supply air to the emergency (supply) lines. Use the trailer handbrake to provide air to the service line. Go to the rear of the rig. Open the emergency line shut-off valve at the rear of the last trailer. You should hear air escaping, showing the entire system is charged. Close the emergency line valve. Open the service line valve to check that service pressure goes through all the trailers (this test assumes that the trailer handbrake or the service brake pedal is on), and then close the valve. If you do NOT hear air escaping from both lines, check that the shut-off valves on the trailer(s) and dolly(ies) are in the OPEN position. You MUST have air all the way to the back for all the brakes to work.
Test Tractor Protection Valve. Charge the trailer air brake system. (That is, build up normal air pressure and push the "air supply" knob in.) Shut the engine off. Step on and off the brake pedal several times to reduce the air pressure in the tanks. The trailer air supply control (also called the tractor protection valve control) should pop out (or go from "normal" to "emergency" position) when the air pressure falls into the pressure range specified by the manufacturer. (Usually within the range of 20 to 45 psi.)
If the tractor protection valve doesn't work right, an air hose or trailer brake leak could drain all the air from the tractor. This would cause the emergency brakes to come on, with possible loss of control.
Test Trailer Emergency Brakes. Charge the trailer air brake system and check that the trailer rolls freely. Then stop and pull out the trailer air supply control (also called tractor protection valve control or trailer emergency valve), or place it in the "emergency" position. Pull gently on the trailer with the tractor to check that the trailer emergency brakes are on.
Test Trailer Service Brakes. Check for normal air pressure, release the parking brakes, move the vehicle forward slowly, and apply trailer brakes with the hand control (trolley valve), if so equipped. You should feel the brakes come on. This tells you the trailer brakes are connected and working. (The trailer brakes should be tested with the hand valve but controlled in normal operation with the foot pedal, which applies air to the service brakes at all wheels.)
Subsection 6.5
Test Your Knowledge
- Which shut-off valves should be open and which closed?
- How can you test that air flows to all trailers?
- How can you test the tractor protection valve?
- How can you test the trailer emergency brakes?
- How can you test the trailer service brakes?
These questions may be on your test. If you can't answer all of them, re-read subsection 6.5.
Check out our Customer Reviews!