
Florida CDL Handbook: Vehicle Inspection
2. Driving Safely
- 2.1. Vehicle Inspection
- 2.2. Basic Control of Your Vehicle
- 2.3. Shifting Gears
- 2.4. Seeing
- 2.5. Communicating
- 2.6. Controlling Speed
- 2.7. Managing Space
- 2.8. Seeing Hazards
- 2.9. Distracted Driving
- 2.10. Aggressive Drivers/Road Rage
- 2.11. Driving at Night
- 2.12. Driving in Fog
- 2.13. Driving in Winter
- 2.14. Driving in Very Hot Weather
- 2.15. Railroad-highway Crossings
- 2.16. Mountain Driving
- 2.17. Driving Emergencies
- 2.18. Antilock Braking Systems (ABS)
- 2.19. Skid Control and Recovery
- 2.20. Accident Procedures
- 2.21. Fires
- 2.22. Alcohol, Other Drugs, and Driving
- 2.23. Staying Alert and Fit to Drive
- 2.24. Hazardous Materials Rules For All Commercial Drivers
2.1.1 Why Inspect
Safety is the most important reason you inspect your vehicle, safety for yourself and for other road users.
A vehicle defect found during an inspection could save you problems later. You could have a breakdown on the road that will cost time and dollars, or even worse, a crash caused by the defect.
Federal and state laws require that drivers inspect their vehicles. Federal and state inspectors also may inspect your vehicles. If they judge the vehicle to be unsafe, they will put it "out of service" until it is fixed.
2.1.2 Types of Vehicle Inspection
Pre-trip Inspection. A pre-trip inspection will help you find problems that could cause a crash or breakdown.
During a Trip. For safety you should:
- Watch gauges for signs of trouble.
- Use your senses to check for problems (look, listen, smell, feel).
- Check critical items when you stop:
- Tires, wheels and rims.
- Brakes.
- Lights and reflectors.
- Brake and electrical connections to trailer.
- Trailer coupling devices.
- Cargo securement devices.
After-trip Inspection and Report. You should do an after-trip inspection at the end of the trip, day, or tour of duty on each vehicle you operated. It may include filling out a vehicle condition report listing any problems you find. The inspection report helps a motor carrier know when the vehicle needs repairs.
2.1.3 What to Look For
Tire Problems
- Too much or too little air pressure.
- Bad wear. You need at least 4/32-inch tread depth in every major groove on front tires. You need 2/32 inch on other tires. No fabric should show through the tread or sidewall.
- Cuts or other damage.
- Tread separation.
- Dual tires that come in contact with each other or parts of the vehicle.
- Mismatched sizes.
- Radial and bias-ply tires used together.
- Cut or cracked valve stems.
- Regrooved, recapped, or retreaded tires on the front wheels of a bus. These are prohibited.
Wheel and Rim Problems
- Damaged rims.
- Rust around wheel nuts may mean the nuts are loose--check tightness. After a tire has been changed, stop a short while later and re-check tightness of nuts.
- Missing clamps, spacers, studs, or lugs means danger.
- Mismatched, bent, or cracked lock rings are dangerous.
- Wheels or rims that have had welding repairs are not safe.

Figure 2-1
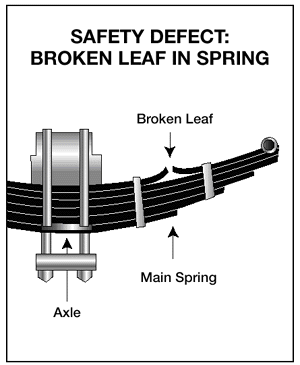
Figure 2-3
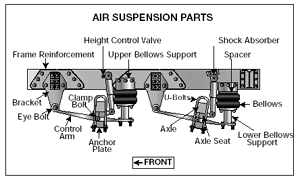
Figure 2-4
Bad Brake Drums or Shoes
- Cracked drums.
- Shoes or pads with oil, grease, or brake fluid on them.
- Shoes worn dangerously thin, missing, or broken.
Steering System Defects
- Missing nuts, bolts, cotter keys, or other parts.
- Bent, loose, or broken parts, such as steering column, steering gear box, or tie rods.
- If power steering equipped, check hoses, pumps, and fluid level; check for leaks.
- Steering wheel play of more than 10 degrees (approximately 2 inches movement at the rim of a 20-inch steering wheel) can make it hard to steer.
Figure 2.1 illustrates a typical steering system.
Suspension System Defects. The suspension system holds up the vehicle and its load. It keeps the axles in place. Therefore, broken suspension parts can be extremely dangerous. Look for:
- Spring hangers that allow movement of axle from proper position. See Figure 2.2.
- Cracked or broken spring hangers.
- Missing or broken leaves in any leaf spring. If one-fourth or more are missing, it will put the vehicle "out of service", but any defect could be dangerous. See Figure 2.3.
- Broken leaves in a multi-leaf spring or leaves that have shifted so they might hit a tire or other part.
- Leaking shock absorbers.
- Torque rod or arm, u-bolts, spring hangers, or other axle positioning parts that are cracked, damaged, or missing.
- Air suspension systems that are damaged and/or leaking. See Figure 2.4.
- Any loose, cracked, broken, or missing frame members.
Exhaust System Defects. A broken exhaust system can let poison fumes into the cab or sleeper berth. Look for:
- Loose, broken, or missing exhaust pipes, mufflers, tailpipes, or vertical stacks.
- Loose, broken, or missing mounting brackets, clamps, bolts, or nuts.
- Exhaust system parts rubbing against fuel system parts, tires, or other moving parts of vehicle.
- Exhaust system parts that are leaking.
Emergency Equipment. Vehicles must be equipped with emergency equipment. Look for:
- Fire extinguisher(s).
- Spare electrical fuses (unless equipped with circuit breakers).
- Warning devices for parked vehicles (for example, three reflective warning triangles).
Cargo (Trucks). You must make sure the truck is not overloaded and the cargo is balanced and secured before each trip. If the cargo contains hazardous materials, you must inspect for proper papers and placarding.
2.1.4 CDL Pre-trip Vehicle Inspection Test
In order to obtain a CDL you will be required to pass a pre-trip vehicle inspection test. You will be tested to see if you know whether your vehicle is safe to drive. You will be asked to do a pre-trip inspection of your vehicle and explain to the examiner what you would inspect and why. The following seven-step inspection method should be useful.
2.1.5 Seven-step Inspection Method
Method of Inspection. You should do a pre-trip inspection the same way each time so you will learn all the steps and be less likely to forget something.
Approaching the Vehicle. Notice general condition. Look for damage or vehicle leaning to one side. Look under the vehicle for fresh oil, coolant, grease, or fuel leaks. Check the area around the vehicle for hazards to vehicle movement (people, other vehicles, objects, low-hanging wires, limbs, etc.).
Vehicle Inspection Guide
Step 1: Vehicle Overview
Review Last Vehicle Inspection Report. Drivers may have to make a vehicle inspection report in writing each day. The motor carrier must repair any items in the report that affect safety and certify on the report that repairs were made or were unnecessary. You must sign the report only if defects were noted and certified to be repaired or not needed to be repaired.
Step 2: Check Engine Compartment
Check That the Parking Brakes Are On and/or Wheels Chocked. You may have to raise the hood, tilt the cab (secure loose things so they don't fall and break something), or open the engine compartment door. Check the following:
- Engine oil level.
- Coolant level in radiator; condition of hoses.
- Power steering fluid level; hose condition (if so equipped).
- Windshield washer fluid level.
- Battery fluid level, connections, and tie downs (battery may be located elsewhere).
- Automatic transmission fluid level (may require engine to be running).
- Check belts for tightness and excessive wear (alternator, water pump, air compressor)--learn how much "give" the belts should have when adjusted right, and check each one.
- Leaks in the engine compartment (fuel, coolant, oil, power steering fluid, hydraulic fluid, battery fluid).
- Cracked, worn electrical wiring insulation.
Lower and secure hood, cab, or engine compartment door.
Step 3: Start Engine and Inspect Inside the Cab
Get In and Start Engine
- Make sure parking brake is on.
- Put gearshift in neutral (or "park" if automatic).
- Start engine; listen for unusual noises.
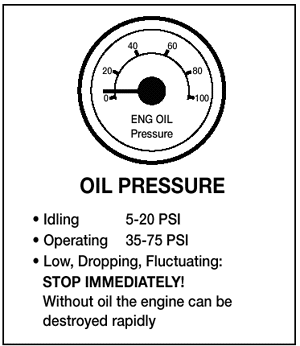
Figure 2-5
Look at the Gauges
- Oil pressure. Should come up to normal within seconds after engine is started. See Figure 2.5
- Air pressure. Pressure should build from 50 to 90 psi within 3 minutes.
- Ammeter and/or voltmeter. Should be in normal range(s).
- Coolant temperature. Should begin gradual rise to normal operating range.
- Engine oil temperature. Should begin gradual rise to normal operating range.
- Warning lights and buzzers. Oil, coolant, charging circuit warning, and antilock brake system lights should go out right away.
Check Condition of Controls. Check all of the following for looseness, sticking, damage, or improper setting:
- Steering wheel.
- Clutch.
- Accelerator ("gas pedal").
- Brake controls.
- Foot brake.
- Trailer brake (if vehicle has one).
- Parking brake.
- Retarder controls (if vehicle has them).
- Transmission controls.
- Interaxle differential lock (if vehicle has one).
- Horn(s).
- Windshield wiper/washer.
- Lights.
- Headlights.
- Dimmer switch.
- Turn signal.
- Four-way flashers.
- Parking, clearance, identification, marker switch(es).
Check Mirrors and Windshield. Inspect mirrors and windshield for cracks, dirt, illegal stickers, or other obstructions to seeing clearly. Clean and adjust as necessary.
Check Emergency Equipment
- Check for safety equipment:
- Spare electrical fuses (unless vehicle has circuit breakers).
- Three red reflective triangles.
- Properly charged and rated fire extinguisher.
- Check for optional items such as:
- Chains (where winter conditions require).
- Tire changing equipment.
- List of emergency phone numbers.
- Accident reporting kit (packet).
Step 4: Turn Off Engine and Check Lights
Make sure the parking brake is set, turn off the engine, and take the key with you. Turn on headlights (low beams) and four-way emergency flashers, and get out of the vehicle.
Step 5: Do Walkaround Inspection
- Go to front of vehicle and check that low beams are on and both of the four-way flashers are working.
- Push dimmer switch and check that high beams work.
- Turn off headlights and four-way emergency flashers.
- Turn on parking, clearance, side-marker, and identification lights.
- Turn on right turn signal, and start walk-around inspection.
General
- Walkaround and inspect.
- Clean all lights, reflectors, and glass as you go along.
Left Front Side
- Driver's door glass should be clean.
- Door latches or locks should work properly.
- Left front wheel.
- Condition of wheel and rim--missing, bent, broken studs, clamps, lugs, or any signs of misalignment.
- Condition of tires--properly inflated, valve stem and cap OK, no serious cuts, bulges, or tread wear.
- Use wrench to test rust-streaked lug nuts, indicating looseness.
- Hub oil level OK, no leaks.
- Left front suspension.
- Condition of spring, spring hangers, shackles, u-bolts.
- Shock absorber condition.
- Left front brake.
- Condition of brake drum or disc.
- Condition of hoses.
Front
- Condition of front axle.
- Condition of steering system.
- No loose, worn, bent, damaged or missing parts.
- Must grab steering mechanism to test for looseness.
- Condition of windshield.
- Check for damage and clean if dirty.
- Check windshield wiper arms for proper spring tension.
- Check wiper blades for damage, "stiff" rubber, and securement.
- Lights and reflectors.
- Parking, clearance, and identification lights clean, operating, and proper color (amber at front).
- Reflectors clean and proper color (amber at front).
- Right front turn signal light clean, operating, and proper color (amber or white on signals facing forward).
Right Side
- Right front: check all items as done on left front.
- Primary and secondary safety cab locks engaged (if cab-over-engine design).
- Right fuel tank(s).
- Securely mounted, not damaged, or leaking.
- Fuel crossover line secure.
- Tank(s) contain enough fuel.
- Cap(s) on and secure.
- Condition of visible parts.
- Rear of engine--not leaking.
- Transmission--not leaking.
- Exhaust system--secure, not leaking, not touching wires, fuel, or air lines.
- Frame and cross members--no bends or cracks.
- Air lines and electrical wiring--secured against snagging, rubbing, wearing.
- Spare tire carrier or rack not damaged (if so equipped).
- Spare tire and/or wheel securely mounted in rack.
- Spare tire and wheel adequate (proper size, properly inflated).
- Cargo securement (trucks).
- Cargo properly blocked, braced, tied, chained, etc.
- Header board adequate, secure (if required).
- Side boards, stakes strong enough, free of damage, properly set in place (if so equipped).
- Canvas or tarp (if required) properly secured to prevent tearing, billowing, or blocking of mirrors.
- If oversize, all required signs (flags, lamps, and reflectors) safely and properly mounted and all required permits in driver's possession.
- Curbside cargo compartment doors in good condition, securely closed, latched/locked and required security seals in place.
Right Rear
- Condition of wheels and rims--no missing, bent, or broken spacers, studs, clamps, or lugs.
- Condition of tires--properly inflated, valve stems and caps OK, no serious cuts, bulges, tread wear, tires not rubbing each other, and nothing stuck between them.
- Tires same type, e.g., not mixed radial and bias types.
- Tires evenly matched (same sizes).
- Wheel bearing/seals not leaking.
- Suspension.
- Condition of spring(s), spring hangers, shackles, and u-bolts.
- Axle secure.
- Powered axle(s) not leaking lube (gear oil).
- Condition of torque rod arms, bushings.
- Condition of shock absorber(s).
- If retractable axle equipped, check condition of lift mechanism. If air powered, check for leaks.
- Condition of air ride components.
- Brakes.
- Brake adjustment.
- Condition of brake drum(s) or discs.
- Condition of hoses--look for any wear due to rubbing.
- Lights and reflectors.
- Side-marker lights clean, operating, and proper color (red at rear, others amber).
- Side-marker reflectors clean and proper color (red at rear, others amber).
Rear
- Lights and reflectors.
- Rear clearance and identification lights clean, operating, and proper color (red at rear).
- Reflectors clean and proper color (red at rear).
- Taillights clean, operating, and proper color (red at rear).
- Right rear turn signal operating, and proper color (red, yellow, or amber at rear).
- License plate(s) present, clean, and secured.
- Splash guards present, not damaged, properly fastened, not dragging on ground, or rubbing tires.
- Cargo secure (trucks).
- Cargo properly blocked, braced, tied, chained, etc.
- Tailboards up and properly secured.
- End gates free of damage, properly secured in stake sockets.
- Canvas or tarp (if required) properly secured to prevent tearing, billowing, or blocking of either the rearview mirrors or rear lights.
- If over-length, or over-width, make sure all signs and/or additional lights/flags are safely and properly mounted and all required permits are in driver's possession.
- Rear doors securely closed, latched/locked.
Left Side
- Check all items as done on right side, plus:
- Battery(ies) (if not mounted in engine compartment).
- Battery box(es) securely mounted to vehicle.
- Box has secure cover.
- Battery(ies) secured against movement.
- Battery(ies) not broken or leaking.
- Fluid in battery(ies) at proper level (except maintenance-free type).
- Cell caps present and securely tightened (except maintenance-free type).
- Vents in cell caps free of foreign material (except maintenance-free type).
Step 6: Check Signal Lights
Get In and Turn Off Lights
- Turn off all lights.
- Turn on stop lights (apply trailer hand brake or have a helper put on the brake pedal).
- Turn on left turn signal lights.
Get Out and Check Lights
- Left front turn signal light clean, operating and proper color (amber or white on signals facing the front).
- Left rear turn signal light and both stop lights clean, operating, and proper color (red, yellow, or amber).
Get In Vehicle
- Turn off lights not needed for driving.
- Check for all required papers, trip manifests, permits, etc.
- Secure all loose articles in cab (they might interfere with operation of the controls or hit you in a crash).
- Start the engine.
Step 7: Start the Engine and Check
Test for Hydraulic Leaks. If the vehicle has hydraulic brakes, pump the brake pedal three times. Then apply firm pressure to the pedal and hold for five seconds. The pedal should not move. If it does, there may be a leak or other problem. Get it fixed before driving. If the vehicle has air brakes, do the checks described in Sections 5 and 6 of this manual.
Brake System
Test Parking Brake
- Fasten seat belt.
- Allow vehicle to move forward slowly.
- Apply parking brake.
- If it doesn't stop vehicle, it is faulty; get it fixed.
Test Service Brake Stopping Action
- Go about five miles per hour.
- Push brake pedal firmly
- "Pulling" to one side or the other can mean brake trouble.
- Any unusual brake pedal "feel" or delayed stopping action can mean trouble.
If you find anything unsafe during the pre-trip inspection, get it fixed. Federal and state laws forbid operating an unsafe vehicle.
2.1.6 Inspection During a Trip
Check Vehicle Operation Regularly
You should check:
- Instruments.
- Air pressure gauge (if you have air brakes).
- Temperature gauges.
- Pressure gauges.
- Ammeter/voltmeter.
- Mirrors.
- Tires.
- Cargo, cargo covers.
If you see, hear, smell, or feel anything that might mean trouble, check it out.
Safety Inspection. Drivers of trucks and truck tractors when transporting cargo must inspect the securement of the cargo within the first 50 miles of a trip and every 150 miles or every three hours (whichever comes first) after.
2.1.7 After-trip Inspection and Report
You may have to make a written report each day on the condition of the vehicle(s) you drove. Report anything affecting safety or possibly leading to mechanical breakdown.
Subsection 2.1
Test Your Knowledge
The vehicle inspection report tells the motor carrier about problems that may need fixing. Keep a copy of your report in the vehicle for one day. That way, the next driver can learn about any problems you have found.
- What is the most important reason for doing a vehicle inspection?
- What things should you check during a trip?
- Name some key steering system parts.
- Name some suspension system defects.
- What three kinds of emergency equipment must you have?
- What is the minimum tread depth for front tires? For other tires?
- Name some things you should check on the front of your vehicle during the walkaround inspection.
- What should wheel bearing seals be checked for?
- How many red reflective triangles should you carry?
- How do you test hydraulic brakes for leaks?
- Why put the starter switch key in your pocket during the pre-trip inspection?
These questions may be on your test. If you can't answer them all, re-read subsection 2.1.
Check out our Customer Reviews!