
Category Archive: Driving Skills
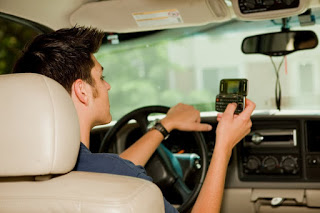
Texting and Driving: What happens when a vehicle comes in your lane.
January 20, 2012
You can read about it several times a week; a driver who is either texting, using a cell phone, or engaged in some other form of distracted driving, drifts over into the oncoming lane causing a crash. This type of crash is becoming all too common and unfortunately, death is often the result. Head-on crashes are the worst type of crash with the greatest potential for serious injuries and death. However, a driver in your lane doesn’t automatically have to result in a head-on crash if you are prepared.
To be prepared for the unexpected drivers should always use the S.I.P.D.E method of defensive driving. That is:
- Search the driving scene – Always be aware of what is happening in front of you, to the sides, and behind.
- Identify hazards – Be on the lookout for anything that could be a potential hazard whether that be a driver about to pull out of a parking lot or a driver ahead who is obviously distracted and isn’t looking at the roadway.
- Predict what may happen – When trying to predict what the other driver might do, in order to best prepare yourself, always predict the worst thing that could possibly happen.
- Decide what you will do – Having a decision already in mind if that other driver should do the worst will allow you additional precious time to escape a collision situation.
- Execute your decision – If the worst thing happens, you will have to put your plan into action in order to escape a collision.
Note: Sometimes you may not be able to completely escape a collision, when planning and executing your decision, you may have to choose to lessen the crash forces rather than escape a crash altogether.
If a driver ahead should suddenly swerve into your lane, you may have very few choices but, to avoid or reduce the severity of the crash, follow these tips:
- Honk your horn to alert the other driver.
- Don’t try to swerve to the left into his lane to avoid a crash, he may realize what he is doing and try to swerve back into his lane at the same time.
- Rather than face a head-on crash, it is better to go off the road to the right. There may be hazards there too so steer to avoid them and try to quickly slow to a stop. It is better to go into some bushes than to crash into something hard.
- Sometimes you may face the very tough choice of hitting a car on the right to avoid a head-on crash. Hitting a vehicle that is going in the same direction as you, while still very serious, is often safer than facing a head-on crash.
10 Most Confusing Traffic Signs
December 27, 2011
We all know that traffic signs do an important job: they tell us what exactly we can or can’t do on the road. But what if the signs were confusing? Sometimes this leads to funny stories afterwards, other times it leads to tragedy, as a misunderstood sign may sometimes lead to crashes.
These signs, wherever state they may show up, must be approved by the Manual on Uniform Traffic Control Devices (MUTCD). They create the standard by which all signs could be installed, maintained, and managed by road managers everywhere. The MUTCD is published by the Federal Highway Administration (FHWA).
Here then, is a list of some of the more … confusing traffic signs that are currently out there.
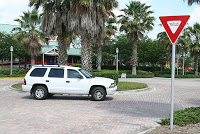
Yield – The red upside-down triangle sign, or sometimes, a simple verbal instruction to “YIELD”? It’s surprising just how many people get confused with this sign. The best way to describe it is it’s like a lighter version of the STOP sign. When faced with this sign, motorists should stop, give way to vehicles from another approach and then enter an intersection. These usually appear in smaller roads that don’t get enough traffic that they don’t necessarily need a STOP sign.
Runaway Vehicles Only – But what if you weren’t running away? This sign signifies that a runaway device is installed in an area. This is usually for trucks that have lost control — the device is usually a patch of road with sand or gravel, which helps vehicles come to a safe stop. The gravel or sand allows the momentum of the big vehicle to dissipate, allowing for safe stopping.
This Side of Sign – This sign signifies that something is allowed on “this side” or the side where the sign is installed. A variation of this sign may say “Parking This Side of Street.” This means that one may only park on that specific side and parking elsewhere may give you a parking ticket.
To Request Green Wait On [Bicycle symbol] – Blame it on confusing wording. This sign is supposed to give bikers a green light. This sign should be used in conjunction with traffic actuators that are adjusted to the amount of metal a bicycle has. If you’ll notice, there is a vertical line going on the top and bottom of the bicycle symbol. This means that bikers should position themselves in the designated marking for them to be detected by the actuators, giving them a green light. Some people confuse this as waiting for bicycles to ride by until they can get a green light.
Look <—-> – Looking left-to-right? Isn’t that what parents and preschool teachers teach kids before crossing the road? This sign is usually located near railways, signifying that motorists should be on the lookout for trains from both directions.
Truck Rollover – Nope this sign doesn’t signify the truck-wheelie lane — it only means that there is a slope nearby that truck drivers should be aware of, since there’s a big tendency for their vehicles to rollover.
Circular Intersection – Though it bears a striking resemblance to the recycling sign, this sign simply signifies that a circular intersection is coming up. Some circular intersections are different. In some cases, the entering vehicles have the right-of-way, while the vehicles inside the circle must yield. Sometimes this is reversed, so drivers have to do a bit of research before they go right through.
Stop Ahead – Stop vertically? No — this is simply a sign that signifies that there will be an oncoming stop. A sign for a sign, perhaps?
9% Grade – The roads aren’t trying to quantify your reading level or your abilities with math. This only means that there is an oncoming 9% Grade slope. Slopes on the road are measured in grades: consider that 9% is 9-feet off a hundred. It means that elevation may change from 5 (5% Grade) to 9 (9% Grade) feet.
DIP – Motorists have to wonder: how exactly are they going to “dip” their cars? This simple sign that says “DIP” means that there will be a dip in the road: parts of the road may go down, and then elevate right back up again.
Having trouble with learning the Roads of the Road and Traffic Signs? Take a DMV Practice Test to become an expert and pass your DMV written exam the first time.
Tips for Proper Parallel Parking
July 14, 2011
Probably, the maneuver that most strikes fear in the heart of a new driver facing a behind-the-wheel driving test, is the parallel parking maneuver. Maneuvering your vehicle, backwards, into a tiny parking spot without hitting the vehicle ahead or behind is daunting even for experienced drivers who don’t have to do it very often but it doesn’t have to be all that scary. Just like any other skill, all it takes is practice…. lots and lots of practice.
You shouldn’t start practicing in a real environment with actual cars in front and back; making a mistake while learning to park around real cars could be costly. Instead, you should begin learning how to perform this maneuver in an empty parking lot with a pair of cones or some other type of marker to represent the front and rear bumpers of the car ahead and behind.
Step one – Illuminate your right turn signal to let other drivers know your intentions. Slow down and pull up alongside the other “car” (cone) until your rear bumper is even with the front vehicle’s rear bumper. Check your mirrors for other traffic and don’t begin until you are sure the way is clear.
Step two – Put the car in reverse and turn the wheel to the right. Turn the upper part of your body to the right so that you can clearly see everything behind you. Start backing slowly and steadily into the space behind. When your passenger door comes even with the rear bumper of the front vehicle, stop.
Step three – Turn the steering wheel to the left and continue backing into the space making sure you aren’t coming too close to the vehicle ahead or about to hit the bumper of the vehicle behind. Once your front bumper has completely cleared the vehicle ahead and your car is completely in the space, stop the car.
Step four – Now put the gear shift into drive and ease the car forward until you are completely centered in the space with enough clear space ahead and behind for you to get out later.
Step five – Put the car in park and get out to see if your car is fully centered. There should be roughly, an even amount of space between your vehicle and the vehicles ahead and behind. Your car should be facing straight ahead and not parked at an angle and the side of your car should be no more than 12 to 18 inches away from the curb.
Keep practicing this parallel parking maneuver over and over until it is second nature to you. With enough practice, you will be able to dazzle the DMV examiner with your skill and confidence.
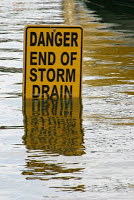
Cars and Waterways
June 28, 2011
Although Florida is known to have many canals, lakes, pools and waterways, many recreational communities in all states have these types of waterways also, and with summer these areas will soon be busy with many visitors.
Could your car end up in the water because of a mistake, like hitting the gas instead of the brake, or being involved in a crash and suddenly you are pushed into a situation that you didn’t expect. Sometimes flooded areas can merge together with a canal or river or lake. What do you do if you find yourself in your car that went into the water?
The answer of course is “Be Prepared”. Have a Plan. There are several acronyms that might help you remember and that can apply to such situations.
The SOS-GO is one emergency reminder.
S – Stay calm
Evaluate your situation quickly. Realize that there may be pressure against the doors and they cannot open immediately.
O – Open the Window
You can roll down the window and leave the vehicle. If you have power windows it may be more difficult. Sometimes the window will work for a few minutes or they could stop working as soon as you hit the water. If that becomes the case, you should have something available to break the window. There are commercial tools available on-line, in dealerships or in auto supply stores. There is the window punch which can be on a key chain or the life-hammer which is mounted in the car somewhere near the driver.
S – Seatbelt must be disengaged.
If you cannot unclip your seatbelt, the life hammer usually has a way to cut the belt.
GO – Get Out
It is most important to leave your vehicle as quickly as possible.
The other acronym that is sometimes used as a reminder is POGO.
P – Pop your belt.
This tells you first to open your seatbelt. If you cannot get it off, cut it with your tool.
O – Open your door.
If the door cannot open, break the window.
GO – Get Out.
Again, the most important thing to remember is that you cannot stay in the vehicle to wait for help.
Some suggestions for surviving a sinking car include being calm and working quickly to get out. Most vehicles will float for only a minute or two before they begin to submerge.
5 steps to safety include:
- Unclip your seat belt or cut it.
- Roll down your window quickly or break it.
- If you cannot get the window to open, look for another means of escape like the rear window or sunroof.
- If there is no other way to get out, try to open the door. The door may be very heavy, make sure it is unlocked.
- If the door will not open, try to be calm, wait until the inside of the car is almost filled with water. Take a deep breath and keep trying to get the door to open. When the pressure is equal the door will open.
The most important things to remember is that you must find a way to GET OUT.

National Drivers Test Highlights
June 17, 2011
Every year, GMAC Insurance offer up a National Drivers Test available for all, regardless of age or state, in order to get a better insight on how motorists are driving around the country. This test usually yields interesting results, such as which is the state with the most capable drivers, or which age group is best at driving performance on the road.
According to the test, these are the top 10 states when it comes to knowledgeable drivers:
1. Kansas
2. Iowa
3. Colorado
4. Minnesota
5. Oregon
6. Nebraska
7. Indiana
8. Missouri
9. South Dakota
10. Wyoming
They have also found that:
- 1 in 4 women failed the test (27.2 percent versus 13.6 percent for male).
- The Northeast is the worst driving region, while the Midwest is the best, based on test scores.
- The elderly succeed. Out of all the test takers, those that belong in the oldest group, aged 60-65 have the highest scores.
- New York and Washington: 1 out of 3 of all drivers in both states failed the test. Be careful on these roads. While New York did move a couple of notches from the bottom of the test results last year, it’s still valid to point out that a majority of NY drivers are getting something wrong on the test.
Do you think this data accurately represents reality? Now in its 7th year, the GMAC Insurance National Drivers Test point out that drivers have improved all over the nation in the last year, but it still tells a sad reality that a large number of people still lack basic driving knowledge. 85 percent were unable to point out the proper course of action when faced with a yellow light, while only a quarter of all test takers were aware of safe following distances.
There’s a lot to be said about the validity and accuracy of tests like these, but there’s more to be said about the results that we’re getting. Law enforcement and driving advocacy groups should see options such as driver’s education in schools and other such initiatives to make sure that year after year, points only go up — along with that, the percentage of safety on the road.