
Tips for Proper Parallel Parking
July 14, 2011
Probably, the maneuver that most strikes fear in the heart of a new driver facing a behind-the-wheel driving test, is the parallel parking maneuver. Maneuvering your vehicle, backwards, into a tiny parking spot without hitting the vehicle ahead or behind is daunting even for experienced drivers who don’t have to do it very often but it doesn’t have to be all that scary. Just like any other skill, all it takes is practice…. lots and lots of practice.
You shouldn’t start practicing in a real environment with actual cars in front and back; making a mistake while learning to park around real cars could be costly. Instead, you should begin learning how to perform this maneuver in an empty parking lot with a pair of cones or some other type of marker to represent the front and rear bumpers of the car ahead and behind.
Step one – Illuminate your right turn signal to let other drivers know your intentions. Slow down and pull up alongside the other “car” (cone) until your rear bumper is even with the front vehicle’s rear bumper. Check your mirrors for other traffic and don’t begin until you are sure the way is clear.
Step two – Put the car in reverse and turn the wheel to the right. Turn the upper part of your body to the right so that you can clearly see everything behind you. Start backing slowly and steadily into the space behind. When your passenger door comes even with the rear bumper of the front vehicle, stop.
Step three – Turn the steering wheel to the left and continue backing into the space making sure you aren’t coming too close to the vehicle ahead or about to hit the bumper of the vehicle behind. Once your front bumper has completely cleared the vehicle ahead and your car is completely in the space, stop the car.
Step four – Now put the gear shift into drive and ease the car forward until you are completely centered in the space with enough clear space ahead and behind for you to get out later.
Step five – Put the car in park and get out to see if your car is fully centered. There should be roughly, an even amount of space between your vehicle and the vehicles ahead and behind. Your car should be facing straight ahead and not parked at an angle and the side of your car should be no more than 12 to 18 inches away from the curb.
Keep practicing this parallel parking maneuver over and over until it is second nature to you. With enough practice, you will be able to dazzle the DMV examiner with your skill and confidence.
How’s My Driving Decals
July 14, 2011
You’ve seen one of them: decals that ask the question: “How’s my Driving?” These used to be more common for trucks, cabs or other public service vehicles — now, several services have popped up that have expanded on the functionality of these decals into letting parents know if their teen drivers are doing a good job of driving.
Here are some of those services:
Teen Road Angel (www.teenroadangel.com) – From their name itself, they are immediately announcing that their focus is towards teens. Upon availing of a membership ($40 annual fees, $20 for additional driver), a specialized decal is created for the driver. When someone calls the number on the decal, a notification is sent to the parent via email, text message or voice mail. They are currently working out deals with insurance companies to hopefully provide discounts for availing of their decals.
JustReportIt (www.justreportit.com) – JustReportIt, the cheapest service in this list comes at only $20 for the first year, and $10 for each renewal. They have achieved this price point by requiring the report entry online-only. There is no special number to call, but relies on people to take note the specialized code assigned to the decal and have them enter it on the report page on their site. While not specifically focused for teens, businesses may also avail of their services and even get their decal customized with a company logo.
The Two-Step Process of Getting a Driver’s License
July 12, 2011
Though the process of getting a driver’s license may be simplified to a few steps, it does not necessarily mean that it is an easy in-and-out operation. One has to prepare well enough to pass both processes. The process that most states have is the knowledge test and the road skills test.
The first step is the knowledge test – this is for getting a permit.
Knowing the proper rules of the road is important when getting a license, so the first test consists of a written road rules and road signs test. Once the new driver has proved they understand the rules of the road, they can receive their learner’s permit to allow them to actually learn the skills needed behind the wheel of a car. The learner’s permit is designed to give new drivers a period (six months to a year), in which they can learn to drive under the close supervision of an experienced licensed driver (21 years of age or older). Once the new driver has developed their driving skills and gained enough experience, they should be ready to pass their driving skills or road test.
The second step, of course, is the driving skills test.
The behind the wheel road test is designed to test the basic driving skills that everyone needs to safely handle a motor vehicle. The road test is really quite simple. Although the road test is quite simple, approximately twenty five percent of new drivers fail in their first try. The examiner will give the new driver instructions to perform simple driving tasks such as parking, making an emergency stop, and a three-point-turn. The test isn’t designed to try to trick the driver and the test examiner will not ask the new driver to do anything that is illegal. If a minor mistake is made, the examiner will note it on the test form. If enough minor mistakes are made, usually adding up to 30 points, the driver will not pass. However, most of the failures are due to simple but costly mistakes. Mistakes such as failing to stop completely at a stop sign or hitting the cones while trying to park are grounds for an automatic failure. New drivers should practice these maneuvers over and over until they are second nature before attempting to pass the road test.
If you hold a valid license from one state and are trying to get a license in a new state, most states will allow a transfer of licenses without any additional tests but some states may require that a driver take either the written road test or both the written test and the road exam. Check the your state’s DMV driving manual and be prepared.
The key to getting a driver’s license is: study well, practice well and be patient.
Top 5 Hints for Passing the DMV Road Test
July 8, 2011
Picture the DMV road test: new driver in the driver’s seat, driving examiner-with-clipboard-in-hand sitting beside him in the passenger’s seat, giving instructions and with an ever-so-tight grip on a pen, taking notes. The driving exam can be grueling for new drivers who are worried about passing/failing — in other words, anxiety may become a factor in passing the driving road test.
Here are the top 5 hints for passing the driving road test:
1. Get lots of practice during your learner’s permit period. In most states, there is a required waiting period from getting a permit or intermediate license before a new driver is allowed to take the road test. This is essentially the state giving the new driver a chance to practice all the skills needed to pass the road test.
2. Obey signs/signals and avoid hitting the cones/curbs. Just because the driving examiner is writing notes on the examination form, that doesn’t mean that new driver has made a mistake. The examiner has to write down the good things as well as the bad. Minor mistakes are allowed but, if those minor mistakes add up to 30 points, you will fail the exam. There are several things that will cause you to automatically fail the exam. Failure to obey traffic signals/signs or hitting the cones/curbs while parking or conducting the three-point-turn are the most common reasons for an automatic failure. For the stopping part, there’s this 4-second-stop rule: to be sure that the car is in a complete halt, step down on the brakes and count to 4 to make sure that the car is totally stopped. For the parking segments, ask a family member (who is a valid license holder) to show you exactly how to park the right way and then practice it – – a lot! Practice the three-point-turn on a narrow street. Practice makes perfect.
3. Follow the examiner’s directions, while demonstrating the ability to make the right decisions. The driving examiner will not ask you any trick questions nor will he or she ask you to do anything that is illegal. Driving is tricky enough all by itself so they don’t have to try to trick you. The examiner will give you straight, simple instructions. Don’t look for the hidden meaning in the instructions; just do as he/she says. If you truly don’t understand the instruction, ask for clarification. It is better to ask than to try to guess and make a mistake. The stupid questions are the ones that don’t get asked.
4. Obey the state’s driving law. This one’s pretty simple, even with varying laws between states, there are still driving laws that are common to most. An example would be:
- Properly wearing a seatbelt before starting the vehicle.
- Properly yielding to other traffic when changing lanes.
- Properly giving a turn signal when turning, changing lanes, or turning into or backing out of a parking space
- Safe driving around school buses and school zones. (There will usually be signs to follow.)
- Knowing the meaning of a Yield sign. Slow and look for other traffic or pedestrians crossing your path and be prepared to stop if necessary. If the way is clear, keep going.
- Stop for pedestrians in a crosswalk.
- Don’t follow too close, maintain a two to three-second following distance.
5. Make sure you have all of the documents that will be needed. In order to take the road test, you will need a current vehicle registration slip that matches the dates on your tags. You will also need a current proof of insurance form. Both of these documents should be in the vehicle at all times. For proof of your ID to get a license, you will need a minimum of the following (check with your local DMV for a complete list):
- Birth Certificate with raised seal (or current passport)
- Social Security Card
- More than one proof of address, such as your parent’s electric or home insurance bills.
You will also need:
- A form signed by your parent of guardian showing you have received the necessary number of driving instruction hours for both day and night driving.
- Your parent’s written permission to receive a license (if under the age of 18).
- A certificate showing you have completed any state required driver education.
Master the Driving Maneuvers for the Road Test with a “Behind-the-Wheel” Online Simulator Course
Cars and Waterways
June 28, 2011
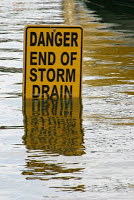
Although Florida is known to have many canals, lakes, pools and waterways, many recreational communities in all states have these types of waterways also, and with summer these areas will soon be busy with many visitors.
Could your car end up in the water because of a mistake, like hitting the gas instead of the brake, or being involved in a crash and suddenly you are pushed into a situation that you didn’t expect. Sometimes flooded areas can merge together with a canal or river or lake. What do you do if you find yourself in your car that went into the water?
The answer of course is “Be Prepared”. Have a Plan. There are several acronyms that might help you remember and that can apply to such situations.
The SOS-GO is one emergency reminder.
S – Stay calm
Evaluate your situation quickly. Realize that there may be pressure against the doors and they cannot open immediately.
O – Open the Window
You can roll down the window and leave the vehicle. If you have power windows it may be more difficult. Sometimes the window will work for a few minutes or they could stop working as soon as you hit the water. If that becomes the case, you should have something available to break the window. There are commercial tools available on-line, in dealerships or in auto supply stores. There is the window punch which can be on a key chain or the life-hammer which is mounted in the car somewhere near the driver.
S – Seatbelt must be disengaged.
If you cannot unclip your seatbelt, the life hammer usually has a way to cut the belt.
GO – Get Out
It is most important to leave your vehicle as quickly as possible.
The other acronym that is sometimes used as a reminder is POGO.
P – Pop your belt.
This tells you first to open your seatbelt. If you cannot get it off, cut it with your tool.
O – Open your door.
If the door cannot open, break the window.
GO – Get Out.
Again, the most important thing to remember is that you cannot stay in the vehicle to wait for help.
Some suggestions for surviving a sinking car include being calm and working quickly to get out. Most vehicles will float for only a minute or two before they begin to submerge.
5 steps to safety include:
- Unclip your seat belt or cut it.
- Roll down your window quickly or break it.
- If you cannot get the window to open, look for another means of escape like the rear window or sunroof.
- If there is no other way to get out, try to open the door. The door may be very heavy, make sure it is unlocked.
- If the door will not open, try to be calm, wait until the inside of the car is almost filled with water. Take a deep breath and keep trying to get the door to open. When the pressure is equal the door will open.
The most important things to remember is that you must find a way to GET OUT.